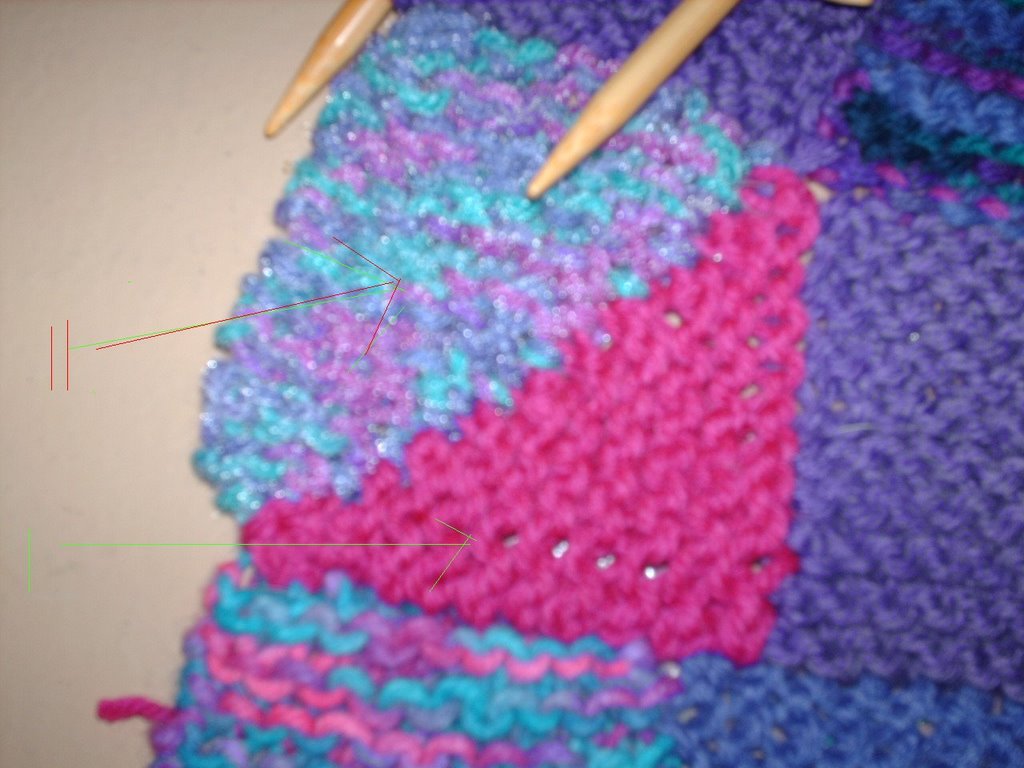
 Two types of triangles:
The dark pink triangle was worked as follows:
Pick up the same number of stitches along each side. Working along the bottom or side, decrease one stitch every other row while knitting the last stitch in that row together with the next stitch on the perpendicular. This results in a triangle which, in this case, is ten ridges high and ten stitches wide. It will look a little skinny until you work another triangle to complement it, creating a square.
The variegated triangle was worked as follows: Cast on 10 (or however many stitches you need), then work one row even. Decrease one by knitting the first two stitches together on the second row, then decrease similarly every THIRD row thereafter. I decrease every third row in order to extend the triangle to 10 ridges (or however many I need to make it match up the the triangle to which I will be joining it). When I have decreased down to three stitches, I check my ridges, which are at 10, and knit the last three stitches together. I did sew this one to the pink triangle, but that's not necessary. I could have just as easily knitted the last stitch together with the bar between ridges on the pink triangle.
You will notice that at this point, things are looking lumpy and uneven. That would happen, perhaps not to this extent, but still somewhat, in any knitted area where I've got three separate things coming together with bind offs, decreases, bits of ending tail, etc. No worries. I already know how to even them out -- one thing that will help is further joinings, another is washing and blocking. An "equalization" strip is shown at the end of this post.
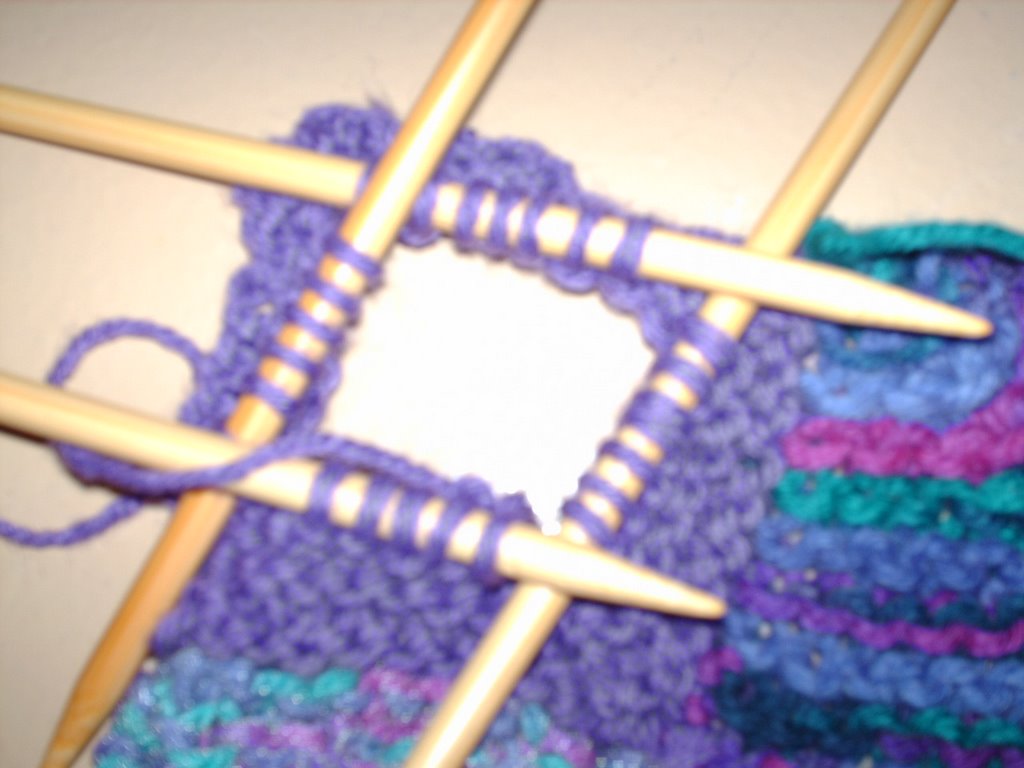
Four Miter Square: Sometimes this makes for a nice change. It can also add interest if I change colors in the center, making it a square within a square. There will be purling. :)
Pick up the same number of stitches along each side of the existing knitting (it could be one, two, three or four), casting on a like number over any open sides. In this case, it's ten on each side. Using dpns, join (make sure to keep the cast on edge even) and purl the next row even. Place markers at the center of each  corner if you like. Next row, knit, decreasing as for any mitering -- you can even just k2tog before and after each marker if you like. You are decreasing 8 stitches each knit row, so this really zooms to nothing in no time. Next row, purl even. Next row, knit, decreasing each side of each marker. If you are going to change colors, do so at the beginning of a knit row. When you are down to 4 stitches total, fasten them together, cut a 3 inch tail and pull through, then pull the tail through to the back side.
 Equalizing row or First Log Cabin Row. At this point, things are looking uneven. As I said above, this happens anytime you are joining a number of bits together or have lots of decreases happening in the same area. When I'm making a CQA, I sometimes add in a strip that evens out the tops of the squares or triangles and gives me a stitch count, so that I know things are staying relatively equal along the sides. Just pick up completely across the top. If there are gaps between joins, pick up the stitch over the join by putting the needle through the last stitch of one, the first stitch of the next bit and pick up ONE stitch total to pull them together. If you happen to have a big stretch of yarn for some reason, pick that up as if it were an M1 -- by twisting it on the needle before pulling the new yarn through; that usually takes up any slack. Work a couple of rows in garter stitch, and even the work out on your needles to make sure it doesn't look bunched or overly stretched and continue working. I usually work about six ridges, but there is no set formula.
It's also a good idea to count before you pick up the stitches (in this case, I figure I'd pick up about 42 stitches across), then go to the opposite side and count those. If the difference is more than three, there's a problem, and now's the time to look over your work with a critical eye and see what went a little off on you. If it still looks fine, then write down the count on either end. On the narrower end, say it was 37 stitches, you'll want to add in about three stitches as you knit an equalizing row, where ever you like. On the broader end, you'll want to decrease down to your chosen number, wherever you like. This particular stripe really makes a difference in keeping the overall afghan even as you work your way through it.
You might choose to "log cabin border" separate blocks of work to even them out, then sew or knit the separate blocks together after you have several. That works out great, too, particularly if you are making bits on the road. There is nothing unique about the technique. Choose a number of rows/ridges that you can easily remember, pick up stitches along one side completely from one side to the other and then knit your chosen number of rows/ridges. BO. You can bind off that last stitch, or leave the loop live to work the next row. Rotate the work 90 degrees so that the tail or last loop is on your chosen beginning side (works for right or left handers), then pick up across the just-knit ridges, and all along the next side completely. Knit the same number of rows/ridges as previously. Repeat for each of the four sides. It doesn't have to be in the same color, not by any means. What makes it "log cabin" as opposed to just equalizing stripes is that a) the stripes are the same width, and b) they are worked one immediately after the other until all four sides are done. Each new stripe overlaps the preceding one and is your chosen number (times one until the last stripe, two for the last stripe) longer than the one on the opposite side.
I recommend using the "log cabin" method for finishing a CQA. I generally use the same color on all sides to "frame" the work uniformly, but that's not necessary and you may choose otherwise. By knitting side after side, there is no need to use several circular needles all at once for a massive, circumnavigating number of stitches; it's just one side at a time and easy as pie. Time consuming, but easy.
Weave in all loose ends. (It will take a long, long time, depending on how many tiny little bits are in your afghan. I either do it as I go or sit down in front of a movie and do it for the length of the movie. It's the most tedious part of the whole afghan process.)
That's it! Please feel free to contact me with any questions, send me pictures of your work, rail at me if my instructions don't work out for you, or simply point at my blog and hoot with derisive laughter. ;) Whatever floats your boat!
Happy knitting!

No comments:
Post a Comment